Sunday, November 20, 2016

Indy Design Gift-A-Long 2016

Wahoo! The 2016 Indy Design Gift-a-long is about to start on Ravelry!


If you know all about the annual GAL click here to go straight to the business

If you've never heard of the Gift-a-Long and would like to know more, check out the link above. All the information is there on the first page.
Basically the GAL is a 6 week knitalong (and crochet along) beginning 22 November. There are contests and prizes - lots and lots of prizes! And already the chat thread is bursting at the seams with peoples plans.

Between 22 - 30 November there are hundreds of patterns being offered by over 300 participating designers for 25% off. Just remember, to get this discount you must use the coupon code “giftalong2016” from 8pm Nov 22 – 11:59 Nov 30 EST.

In the following weeks you can participate in the KALs, win prizes and chat about your wonderful projects. My understanding is that to be eligible for prizes you can knit any of the designer's patterns - they don't have to be sale patterns (but you have to wait to cast on until the GAL starts).

I picked five patterns - I tried to pick patterns I thought people would find interesting, plus a couple of easy ones, so hopefully there is something people will find interesting. Check out the list of participating designers. We even have a map indicating out location.

I'm heading over there now to check out some of my favorite designers, and see what they have on offer.

Tuesday, September 20, 2016

Sock Experiments

While I am procrastinating, and unable to get on to Ravelry, I thought I'd show you my sock experiment. It all started when I got absolutely sick of my handmade socks falling off whenever I kicked off my shoes. While I was knitting the right size (or even a smaller size) for my feet, it appears that my loose tension was allowing the fabric to stretch out ridiculously around the ankle when worn.
The green sock below is an example of this.

All my socks do this. (yes, internal rage!)
Too worn to be successfully pulled undone and reknit in a smaller size / tighter tension I decided a couple of darts might solve the problem. I know sewing darts in knitting after the fact is probably unusual, but these things were heading for the bin, So out came the sewing machine.


And I sewed me some darts.


I cut the seams and zig zagged the edges (I'm not daft!)


And the end result above!
Because I was sewing from the inside (and because I didn't care that much) I didn't successfully sew down a line of stitches (and this would have almost completely hid the seam for much of the dart). But that's ok - because now my socks stay ON! I was completely surprised - this must be what it feels like to knit socks that fit properly. .No more sock sliding half off when kicking off my shoes (seriously, I could have removed my socks just by rubbing my feet backwards on the carpet).
I would have removed at least 10 columns of stitches per sock

So, the things I learned from this experiment:
1. I need to cast on fewer stitches. My current sock is 60 sts.
2. I need to tighten up my tension, or go down to 2mm needles
3. Maybe I need to not throw them in the washing machine with some Persil.
4. Maybe I need to not knit with superwash yarn, which I find allows the fabric to stretch. This goal is probably impossible.
5. Maybe I will have more success knitting socks with a tightly spun yarn.
6. Maybe I need to knit a different kind of heel other than a traditional heel flap.
7. Ribbing?
8. Sewing darts in socks after the fact actually does work!

And in case you're wondering - no I can't feel the darts on the inside. I guess this means I'm not a princess.   :(

Now the thing to decide - do I reknit those other socks I haven't worn yet or do I just whack some darts in????

Thursday, September 8, 2016

Sneak Peak


Speckle Tonic

Speckle yarn is pretty popular right now, and what's not to love about it! Some speckles are crazy fun, and some are a little more subdued, but just as pretty, in my opinion. I've been wanting to try designing with a speckle yarn for some time, and I found these two lovely skeins by Circus Tonic Handmade (here's a link to her etsy store).
I used them to make this - Speckle Tonic!


I started off gently with a delicate speckle called White Browed Woodswallow (the pale colour above) and teamed it up with a semi-solid called Spangled Drongo (yes - that's the name of an Australian bird!). I love how the colours go together and I think the combination of speckle yarn and lace works well together.
This is actually quite a simple knit - lace is working on right side rows only, and much of it is a repeating pattern. I like the balance of colours and the yarn I used Revelry Sock is so darned squishy and smoochy - it's perfect for neck-wear.

I rather think this is just the beginning of my adventure with speckle yarn, and I can't wait to dive into the rest!


Thursday, August 11, 2016

Supplejack

Wow am I behind on posting about my latest designs. (I blame my fascination with Instragram)

Let me introduce Supplejack.


My idea for Supplejack was to design an asymmetrical triangle that traces the developing skills of the knitter. Stripes of squishy garter stitch begins the piece. This is interspersed with blocks of bold colour until you reach the first simple lace section – eyelets edged with garter stitch. More colourful stripes ensue as you work your way down the shawl, encountering small cable twists, a lifted stitch technique and finally move on to the lace sections worked over a stocking stitch background. The piece ends with an elaborate cable-lace border edged with pretty picots. When worn the more elaborate cable-lace section rests alongside the initial garter stripe section in a pleasing contrast of your knitterly skills.


As you can see, it's quite big - great for winding around one's neck in this chilly weather!
I knit mine in three shades of Dark Harbour Yarn: Starboard (fingering weight), in the colours, Nudibranch, Svalbard and Horace. Starboard contains 20% silk, and as a single ply yarn the motifs really pop with the silken sheen.

Ravelry Link to the pattern. Check out other colour combinations that people have used. In fact one of my testers knit hers in a single colour of laceweight rayon, and added beads. It's gorgeous!

Tuesday, April 26, 2016

Still Alive!

Yikes! I feel like it's been ages since I've had a new design off the needles, and maybe it has. This damnable tennis elbow that comes and goes keeps me from doing lots of knitting, but I have actually been producing things.
This wee pile of yarn has the most immediate plans.


That represents 3 shawls. Two have already been knit and are awaiting me to knit them again in thicker/more suitable yarn - lying there unknit on the table. And one I have already started knitting.


This is a departure for me in many ways. A singles yarn (rather than multiple plied singles), an asymmetrical shape, and garter stitch. I may have said rude things about garter stitch (and singles yarn) in the past, but I take it all back. To be fair, there's only a little bit of garter stitch, which will be interspersed with a whole lot of lace. I can't show you much because I'm so slooooooow.

The singles yarn is delightful and represents a departure for me because in the past I've found that it self-destructs too easily - and pilly, fuzzy yarns REALLY annoy me. But I think this one will be absolutely fine for a shawl. The yarn is Dark Harbour Yarn, and mine contains 30% silk for a wonderful shine. The dyer Nikki told me something i have been wondering about but didn't actually 'know' - a singles yarn shines like it does because there is no ply shadow (the silk also shines). In plied yarns each of the plies creates a shadow and affects the way the light reflects off it. I'm really enjoying knitting with it and I can't wait until I get to the bit where I can start some lace!
I don't really like posting images of designs until I'm sure they're actually going to work, but I really feel that if it weren't for this elbow thing i would have had it and the other two finished by now!

Here's a photo of my daughter when she was about 4 years old. This is a photo she took on my phone the other day - a photo of a photo. I remember she was SO delighted to be wearing her Grandma's fancy shawl (circa 1970). Crocheted in Grandma's own handspun yarn.


Monday, March 14, 2016

Minarets and lace KAL

If you fancy knitting Minarets and Lace with like-minded folk, why not join the Knit-Along running in my Ravelry group - Lace Eater Designs.


Minarets and Lace is my most popular design. Maybe it's those double arches, maybe it's all the nupps. Take a look at the thread in my Ravelry group to see some of the stunning modifications that other people have made, like this gorgeous one by KCCknitntiggy that features a picot border.


Thursday, March 3, 2016

Lotus Pond

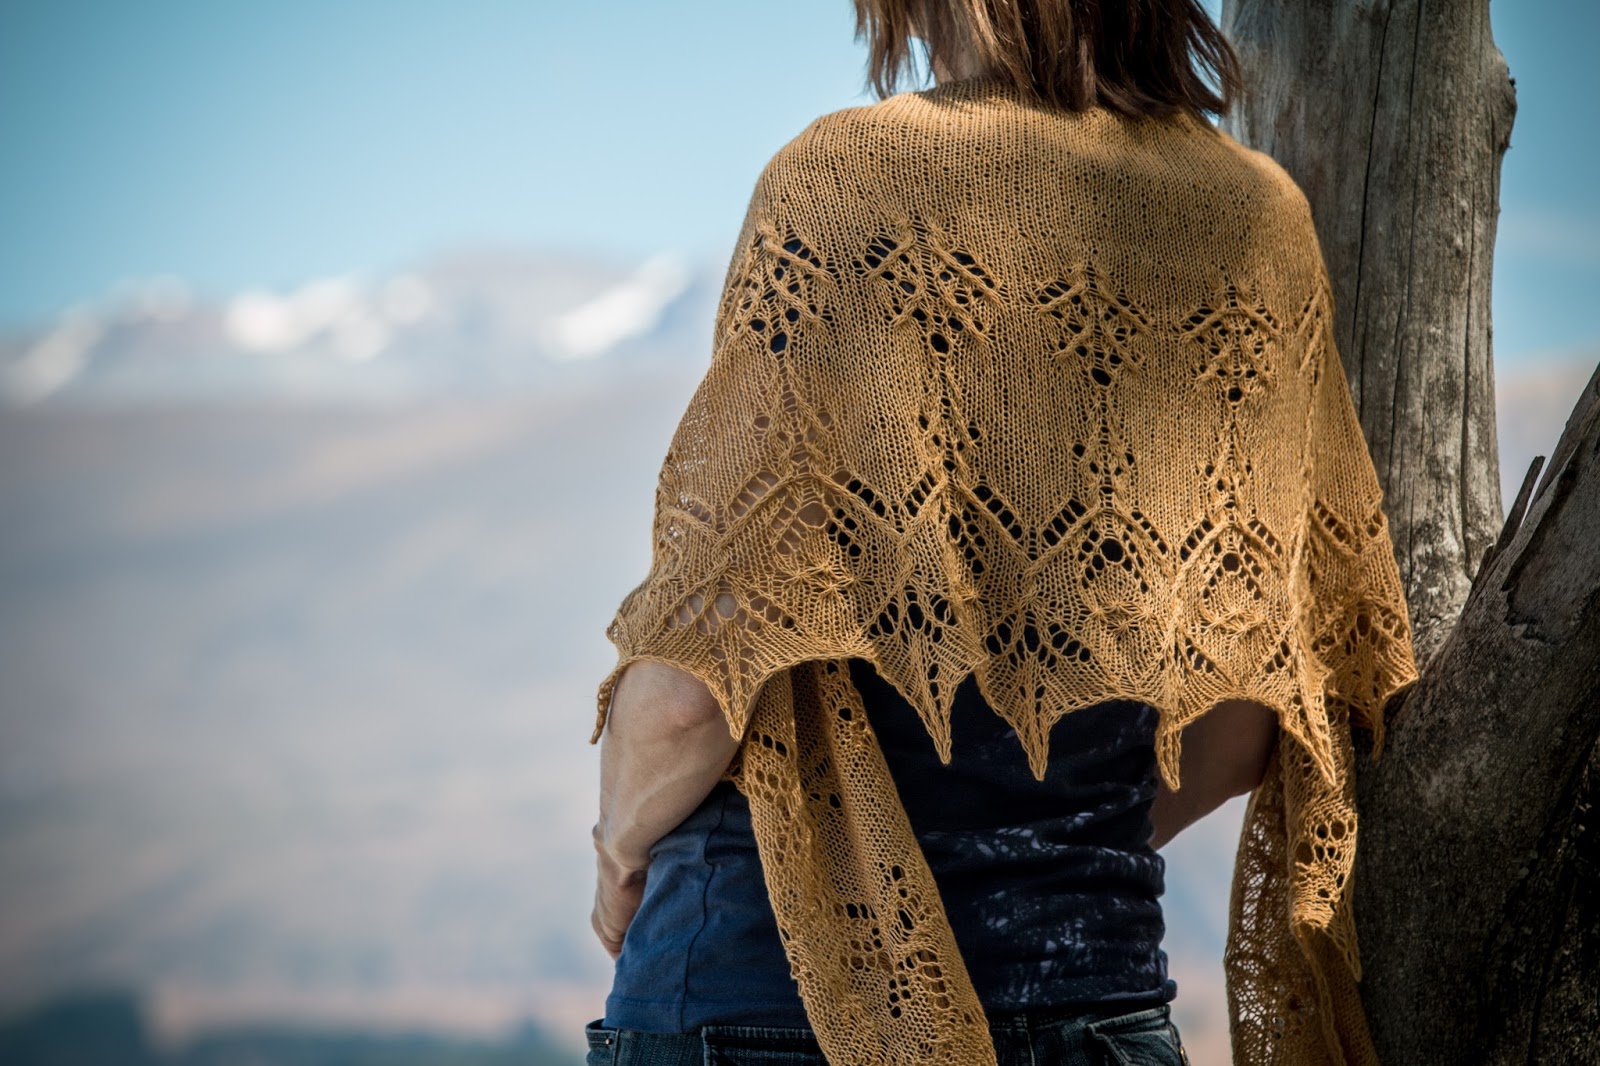
Meet my latest design: Lotus Pond


My fascination with knitted lace and depicting flora and fauna continues in this top down shawl. Motifs include moths (or are they flies!) pansies, lotus flowers and a decorative edging depicting a trefoil. Yes, there are a nupps - but just a few, and to be honest, if you're not inclined nupp-wise, they can easily be swapped out with beads. I think beads would be quite fitting - like water droplets on a lotus flower.
In this pattern I use a Japanese stitch pattern called the Three Stitch Lift, which I have modified to suit my purposes. While the pattern notes describe how this stitch works I thought it might help to talk about it and show you what's going on. So here goes ...

I originally found this stitch in the book, "Knitted Socks East and West", Basically what you do when you work this stitch is work some loops through the middle of your knitting by knitting through the centre of the stitch 3 rows down from the next stitch on you LH needle. I think it takes a little bit of mind bending for some people to get this idea - you actually poke your RH needle right through the knitted fabric - through the centre of the stitch 3 rows down from the next st on the LH needle. You then draw through a loop of working yarn, work a yarn over, and draw another loop through the same place in the knitting once more. You have effectively made 3 new stitches. You then drop the very next stitch on the LH needle. (the one in the column directly above where you have knitted through the fabric. It will only ladder down to the anchor point you have just made with your 3 new stitches. These laddered stitches form pleasing horizontal lines. Try not to make the 3 loops too tight, or the loops they make will not be elongated. In the book I found, these extra stitches (actually only 2 in total, because you drop a stitch) are removed by a centered double decrease on the next RS row, but because I wanted to use this stitch as a way of making increases most of the time, I only included the decreasing row of the stitch pattern in Chart A.

This is what it looks like when you are working the stitch. (note: I have not included the yarn overs and decreases as they appear in the first chart)
(click on the photos if you wish to make them larger)


Through the centre of the stitch - draw through a loop. 1 stitch made


view from above

Below: One loop pulled through


Below: Having already made one loop, work a yarn over, and work step one again. Three loops made. Then drop the next stitch on the needle (already dropped in the photo). You now have only two extra loops/stitches.


Row finished. You will see those three laddered horizontal loops are captured by the stitches you have just made.

 I purled back so you an see what it looks like


If you make a mistake and need to undo a row just leave those three loops on your left needle as you tink, and then make the 3 loops as described when you get to them. (see last photo)


In the pattern I include a variation of this stitch called the 5 Stitch Lift, which results in 5 loops (but 4 extra increases when completed). This is achieved simply by working an additional yarn over and pulling a third loop through the knitting (so 2 yarn overs and 3 loops pulled through the knitting) before letting the next stitch on the LH needle ladder down.

Please note that The 3 and 5 Stitch Lift, are not in any way related to the Lifted Increase used in the stocking stitch section of the shawl even though they share the word "lift". When working a lifted increase you simply lift the right leg of the next stitch onto the needle and knit it (to make a stitch). With the 3 and 5 Stitch Lift you actually knit through the fabric of your knitting.

If you'd like to watch a video of someone working this stitch, click on this link.
It's not in English, but it doesn't matter in the slightest - it demonstrates very well what is going on when working this stitch, and is especially clear on the garter stitch background. Note, she finishes the stitch pattern off with the centred double decrease on a following row.

Try it - it's fun!

Friday, January 22, 2016

High Country Crescent

One of my favourite places is the High Country of the South Island (of NZ), and I've always wanted to design a shawl that reflects its stark beauty. High Country Crescent is my first attempt to do that (as I rather think there are many more knitting motifs to be found in that stunning landscape).

Parched, stony, vast and rugged, this harsh land is connected from the mountains to the sea by a network of sprawling braided rivers, and unassuming plants. This shawl, High Country Crescent, is my homage to that harsh, desolate and beautiful landscape – a landscape that inspires and yet dwarfs the human spirit. Lace and cable stitches create knitted motifs representing braided rivers and tussock flowing to the estuary where High Country river meets the Pacific Ocean

I designed this shawl some time ago, but I really wanted to get photos of it in the actual High Country before I released it on Ravelry. Our summer holidays were the perfect time, and on New Years day we made our way to the headwaters of Lake Tekapo. I know there's snow in the background, but it was hot! (click on the photos to enlarge them, so you can see the detail).


This one was taken at Otira gorge - more Alpine than High Country, but stunning nonetheless and another glorious warm day.


and finally a close up.

I knit mine in Zealana Kiwi Laceweight (colour; Sunset), but any laceweight will do so long as it's not superfine. A 3 ply or light fingering would substitute well too, as Zealana Kiwi is quite a chubby yarn.
It's available in two sizes and requires 600 - 686 metres of yarn. For more information and other examples check out my Ravelry store.